Find QuickBooks Company File Path
The file path describes where your data is being stored in relation to QuickBooks and the QuickBooks Web Connector. You can view your company file path in QuickBooks on the company selection screen. You can access this screen by logging into QuickBooks, clicking the File menu (top left) and choosing Close Company.
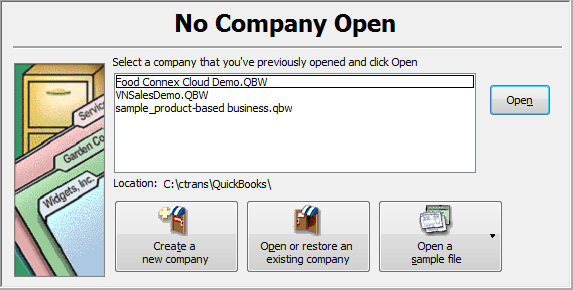
The location combined with your company file name is your full file path. In the example the file path would be:
C:\ctrans\QuickBooks\Food Connex Cloud Demo.QBW
Set Company File Path in Food Connex Cloud
1.In Food Connex Cloud navigate to Accounting > QuickBooks > Configuration
2.Click the Update Settings? checkbox to enable updates.
3.Update the Company File: field with the full file path. Remember to capitalize exactly as shown in QuickBooks.
4.Enter a password for the QuickBooks Web Connector in the QuickBooks Password: field. You will be prompted for this password when setting up the QuickBooks Web Connector in the next step.
5.Click Save and Download QuickBooks Web Connect configuration file button.
6.Save the file and move it to your QuickBooks Company File directory.
Important Notice:
•Create a backup of your QuickBooks Company File before proceeding.
•Once the QuickBooks Web Connector Application is added the QuickBooks Web Connector Configuration File (saved in previous step) cannot be moved.
Edit the QuickBooks Web Connector Configuration File
•Open Wordpad
Windows Start Menu > All Programs > Accessories > Wordpad
•Open the QuickBooks Web Connector Configuration File (saved in previous step)
In Wordpad > File > Open > navigate to configuration file
•Based on the QuickBooks Program you are using change the line that reads: <AuthFlags>0x2</AuthFlags>
oFor QuickBooks Simple Start:
<AuthFlags>0x1</AuthFlags>
oFor QuickBooks Pro (no change needed from default):
<AuthFlags>0x2</AuthFlags>
oFor QuickBooks Premier:
<AuthFlags>0x4</AuthFlags>
oFor QuickBooks Enterprise:
<AuthFlags>0x8</AuthFlags>
•In Wordpad > File > Save, then close Wordpad.
Open QuickBooks Web Connector
To open the Web Connector login to your QuickBooks Company File. Change to single-user mode if you have a multi-user QuickBooks license and login as the Admin. From the File menu choose Update Web Services.
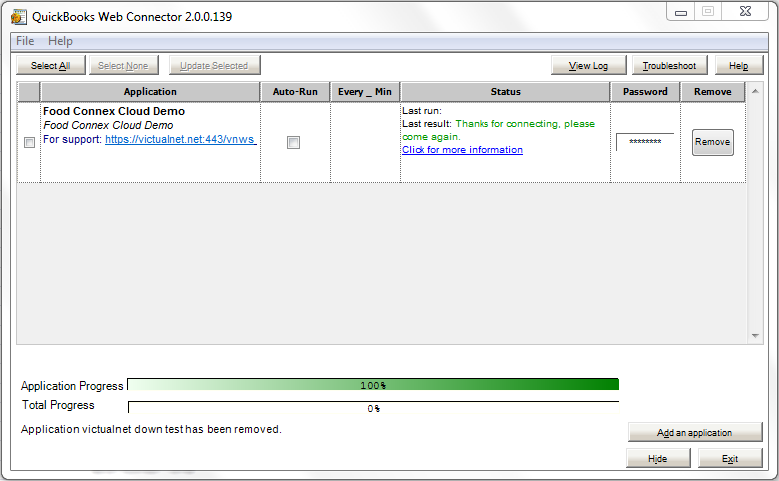
This screenshot shows the QuickBooks Web Connector after the Food Connex Cloud Application has been added.
Add Food Connex Cloud to the Web Connector
1.In the Web Connector click the File menu and choose Add an application.
2.Navigate to the QuickBooks Web Connector file you saved in the previous step.
3.Select it and choose open.
4.You will be prompted to Authorize a New Web Service, click the OK button.
5.You will be prompted with the QuickBooks Application Certificate.
6.Select Yes, always; allow access even if QuickBooks is not running from the permissions list.
7.Click Continue to close the QuickBooks Application Certificate
8.The Web Connector Screen will display as above.
9.Enter the Password you set in the previous step into the password field.
10.As you leave the field you will be prompted to save the password, click Yes.
11.Select the application and choose Update Selected.
12.After initial synchronization completes click to set the application to Auto-Run, 10 minutes is recommended.
13.Click Hide to minimize the Web Connector, it will continue running in the background.
Important Notices:
•The customer name in QuickBooks is restricted to 28 characters. Customer names longer than 28 characters will be truncated.
•Invoices or Credit Memos created in QuickBooks with an alpha character in the Invoice Number field will not display in Food Connex Cloud.
•After the initial synchronization adding new customers should be done in the Food Connex Cloud interface. Customers added to QuickBooks will be synchronized with Food Connex Cloud but may require additional information before orders can be submitted.
Posted invoices from Food Connex Cloud
Posting an invoice in Food Connex Cloud schedules those invoices to be sent to QuickBooks when the Web Connector next runs. The invoices will also be available in the AR Inquiry screen under the customer file in Food Connex Cloud and under the Invoice Reprint screen in the customer file in Food Connex Cloud.
Changes to Customer Information
Changes to the following customer fields are scheduled to be sent through the web connector as soon as they are committed.
Food Connex Cloud Field Name |
QuickBooks Field Name |
Customer Code |
Customer Name |
Customer Name |
Company Name |
Office Fax |
Fax Number |
Office Email |
Email Address |
Accounting Name |
Alternate Contact Name |
Billing Address |
Billing Address |
Terms |
Terms |
Changes to Invoice Status and Account Balances
Changes to the invoice status or account balance in QuickBooks will be scheduled to be sent through the web connector as soon as they are committed.