New Feature ! Default Customer Credit Limits
You can now define a default customer credit limit using System Configs.
From that point forward, when you add a new customer their credit limit will be assigned to the default credit limits you set up; you can override the automatically-assigned credit limit if you want to.
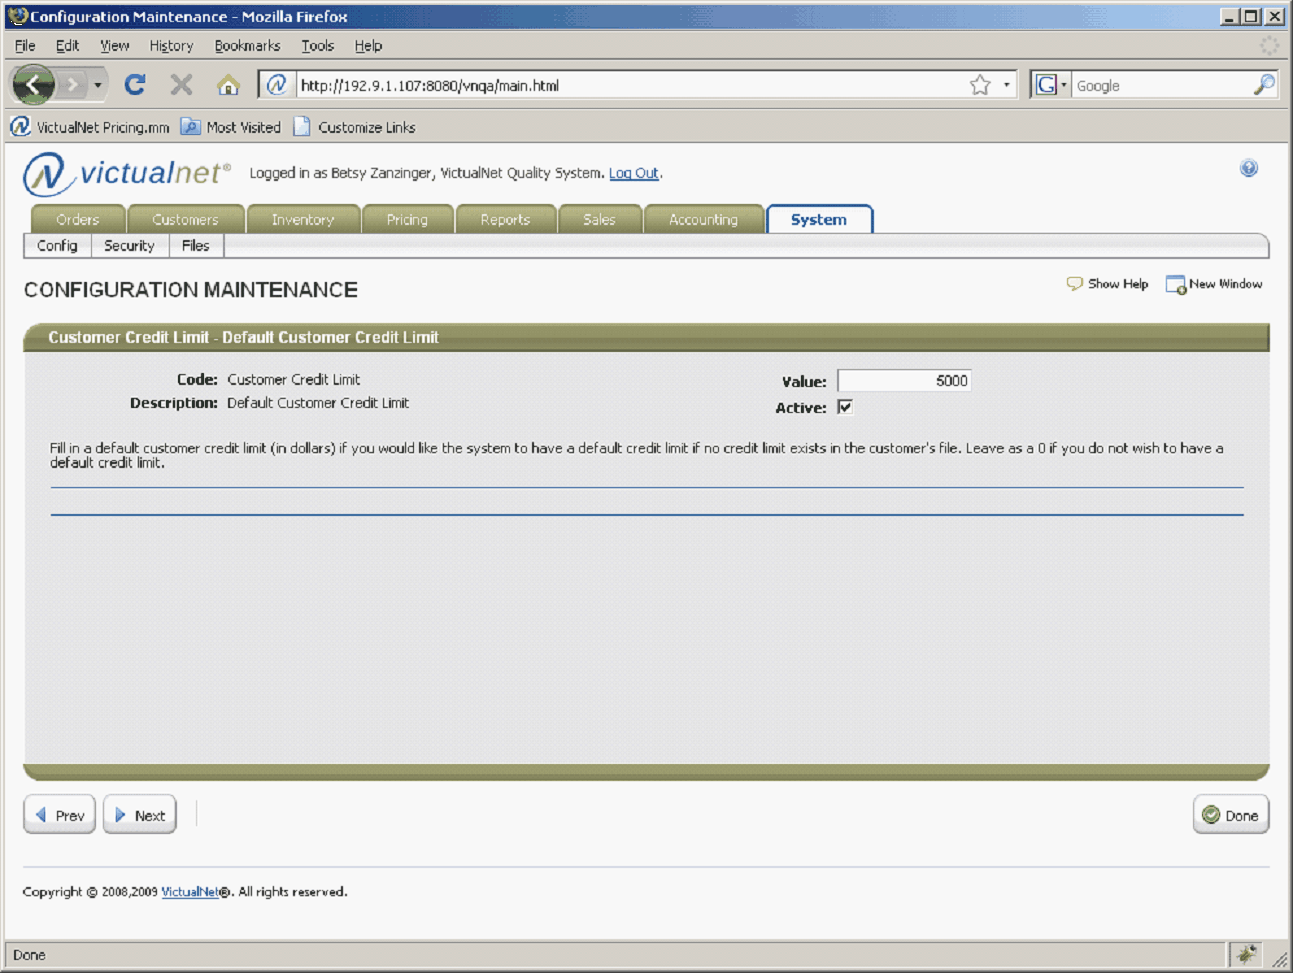
You can update this config yourself by choosing System -> Configs -> and then typing in “limit” in the search box.
Choose the config Customer Credit Limit, and change the Value to whatever you want the credit limit to be. Please make sure that the Active box is checked, per the example below.
Please do not hesitate to call the Food Connex Cloud Support Team if you would like assistance with changing the System Config for Customer Credit Limits.
New Feature ! Default Customer Credit Limits
(continued)
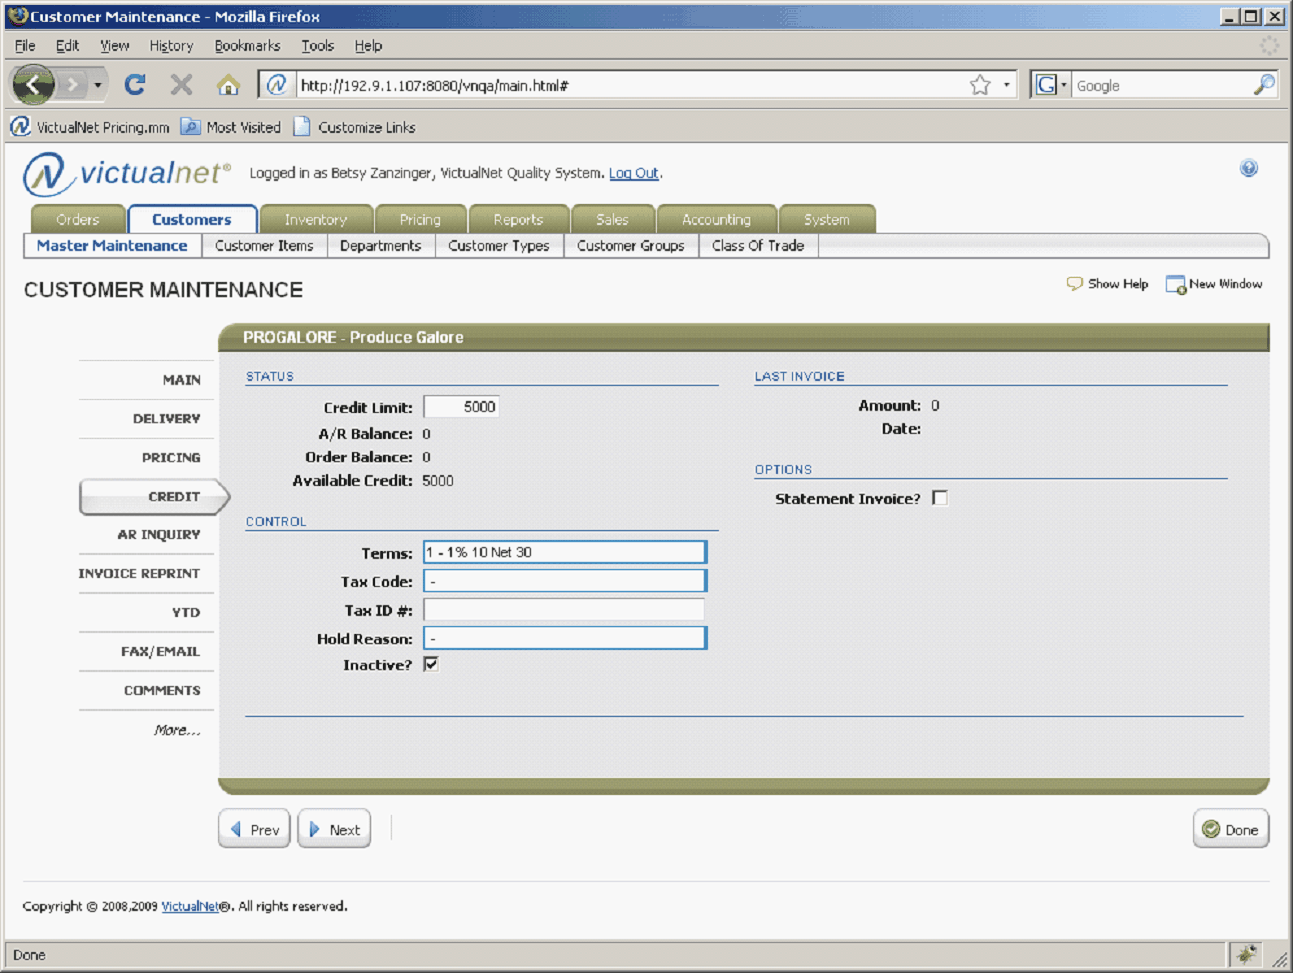
Now when you add a new customer, the Credit Limit will default to the value you assigned above; in this example it is $5000.
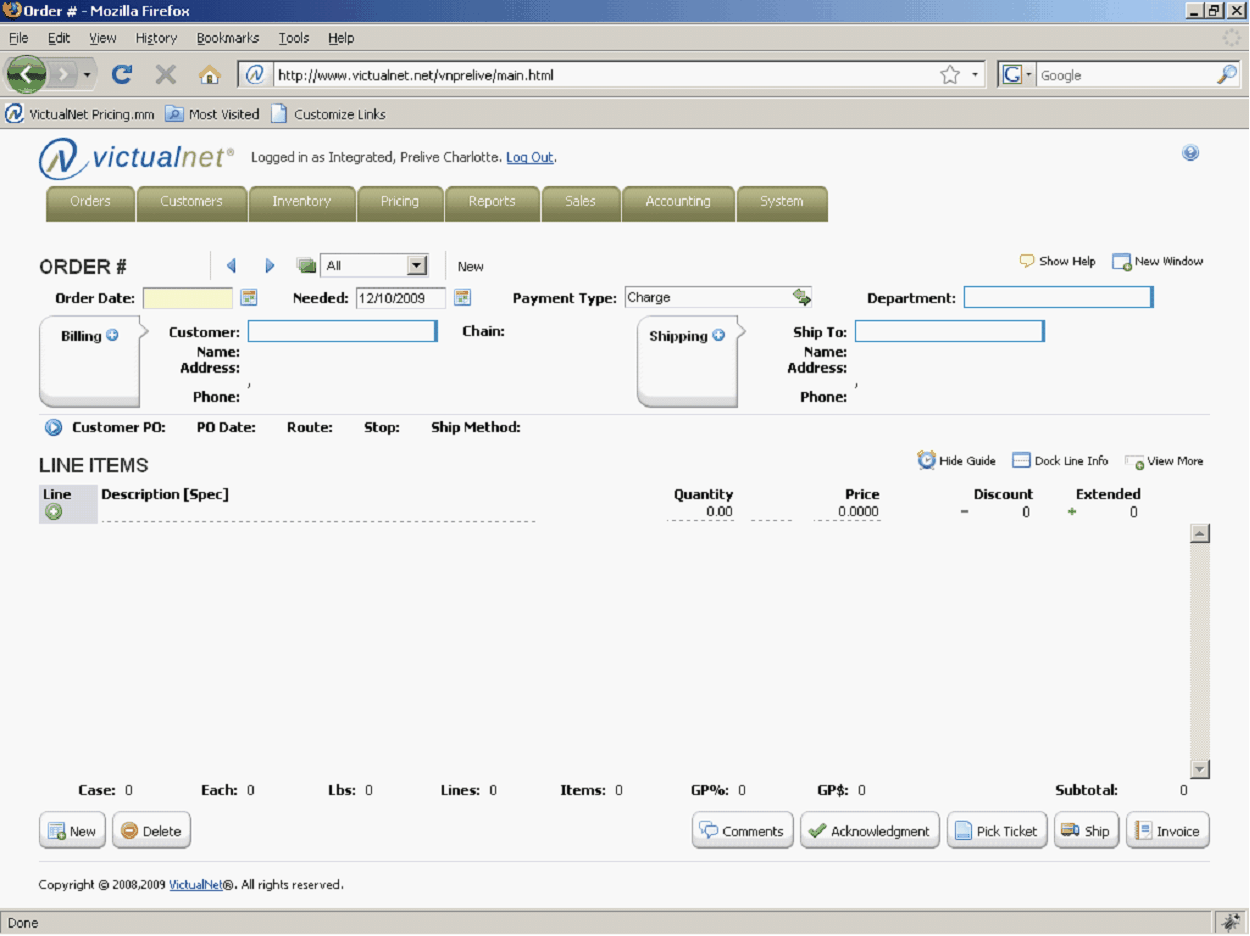
New Feature ! Customer Inactive Flag message
Have you ever added a new customer and forgotten to activate them ? Then, when you try to add an order, you are stopped in your tracks and have to return to the customer maintenance screen and activate the customer.
We have added a message to the customer main screen that tells you that a customer is inactive and how to activate them.
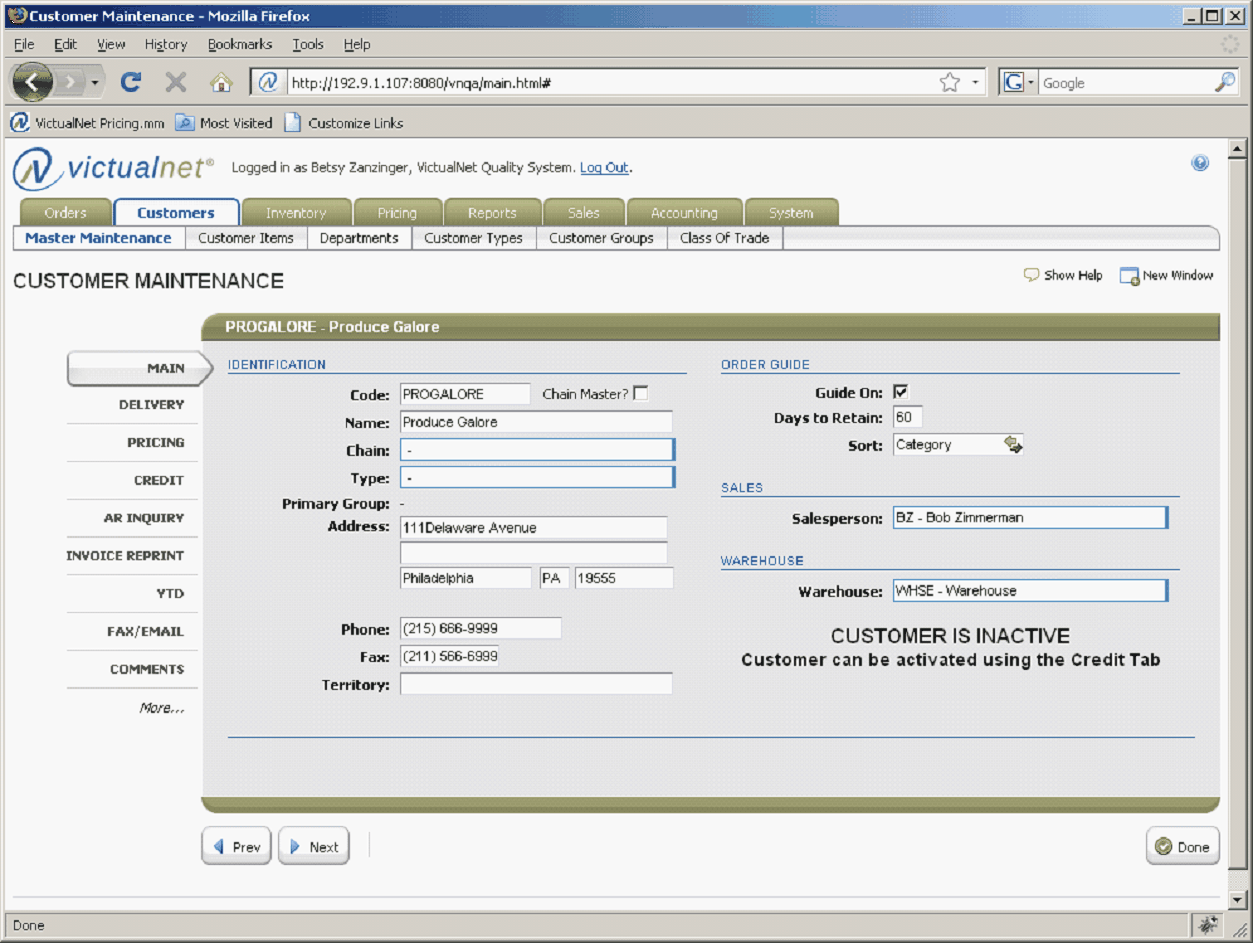
Now, when you add a customer, if you review the screens to make sure you entered all of the customer data correctly, the ‘customer inactive’ message displayed on the main screen is obvious, and will remind you to activate the customer before leaving the customer maintenance process.
New Feature ! Food Connex Cloud Button Security
In November of 2009, Food Connex Cloud security was implemented. This was the first phase of security and allows you to determine which menu options a user has access to. This is somewhat limited; you may want a user to have the ability to add a sales order, but you do not want that user to be able to ship or generate an invoice for the order. However, by allowing them to add an order they automatically have access to the Ship and Invoice buttons on the order screen.
In December, we are introducing a new level of security, based on screen ‘buttons’. The first set of buttons on which security has been implemented are on the order header screen, and include the following:
•New Order
•Delete Order
•Order Comment
•Pick Ticket
•Order Acknowledgement
•Ship
•Invoice
On the screen below, you can see the order header screen as it normally appears to the user, who has all buttons available across the bottom of the screen (New, Delete, Comments, Acknowledgement, Pick Ticket, Ship and Invoice)
New Feature ! Food Connex Cloud Button Security
(continued)
If you want a user to be able to perform all of the button functions except for deleting an order, security can be set on the Delete button, which will remove that button from the screen. Please see below.
If you want to set up button security, or any other security in Food Connex Cloud, we recommend that you contact the Food Connex Cloud support to assist you.
New Feature ! Create Invoice Security
In your operation, it may be valuable to you to have someone who fills and ships orders out in the warehouse, but you don’t want that individual to actually generate the invoice after the order has been shipped.
A new system configuration flag has been added to Food Connex Cloud that will allow you to have Food Connex Cloud skip the order summary screen, where you can enter additional charges, discounts, etc., and return the user to the order header screen after the order has been shipped instead.
The system configuration flag is Skip Ord Sum2.
If you turn this flag on, but want individual users to have access to the invoice summary screen, that can be handled by within the security setup.
On the configuration screen below, the only user who has access to the Order Summary Screen and can generate an invoice from the order header is user Betsy.
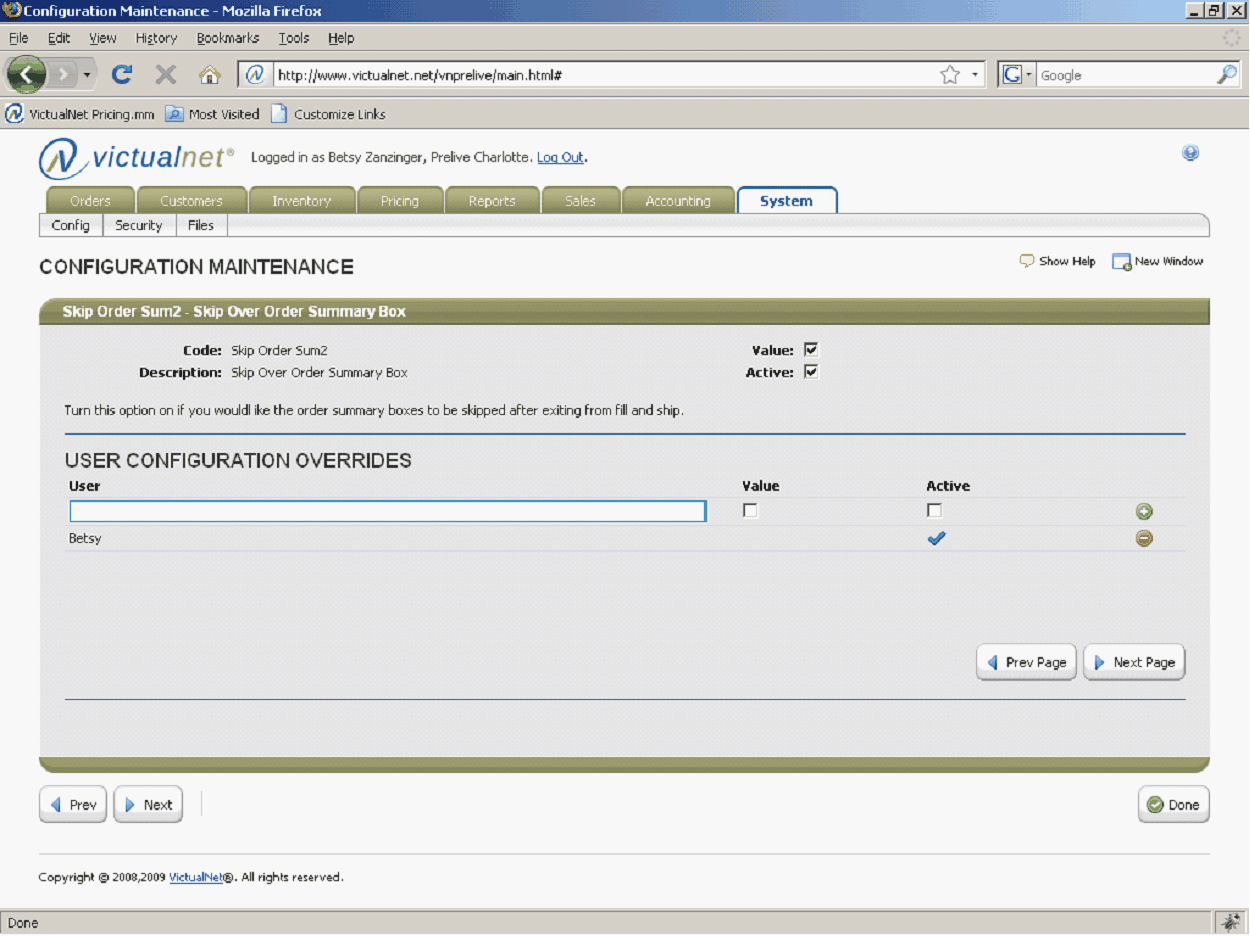
If you want to turn this configuration flag on, or any other system configuration flags, we recommend that you contact the Food Connex Cloud support to assist you.
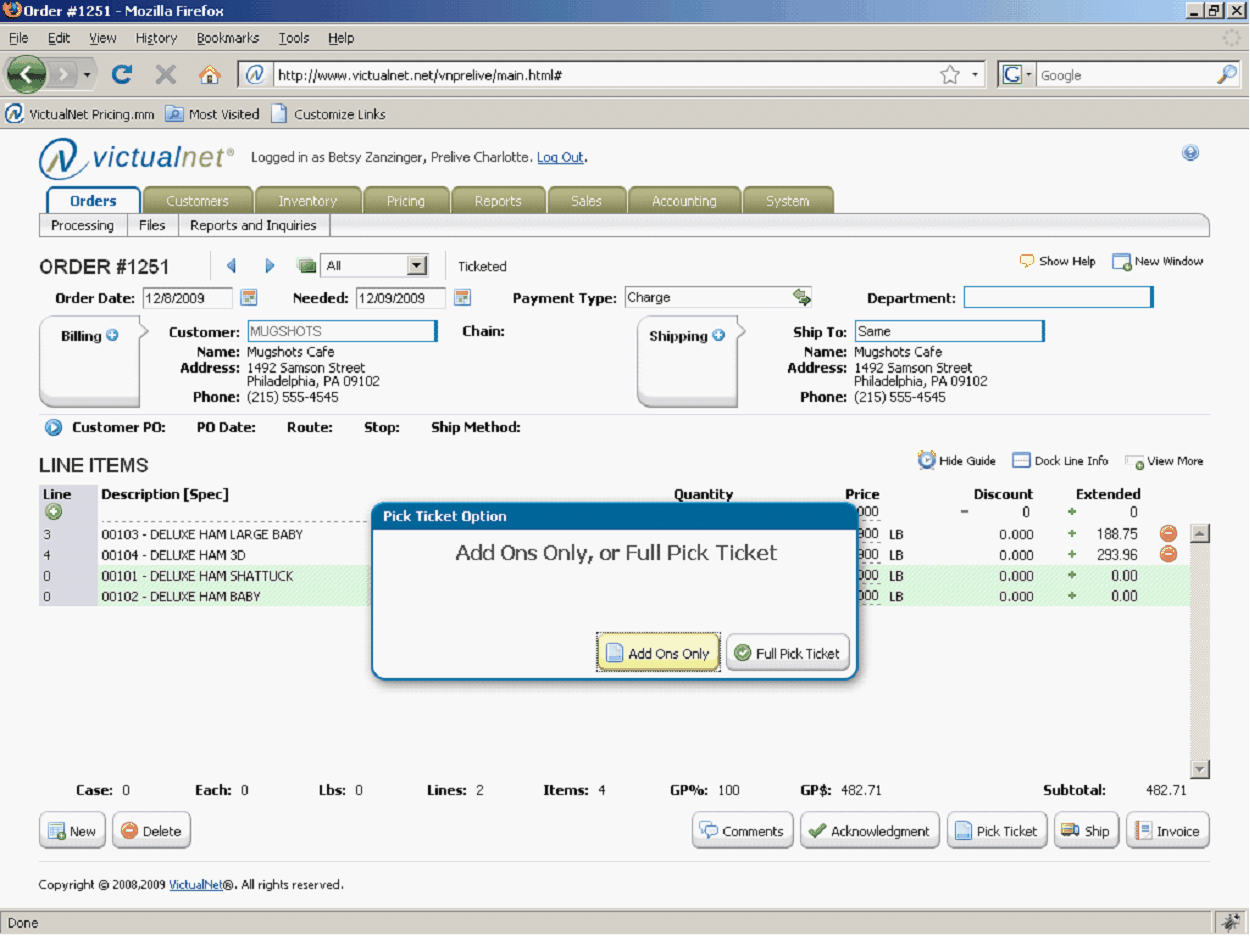
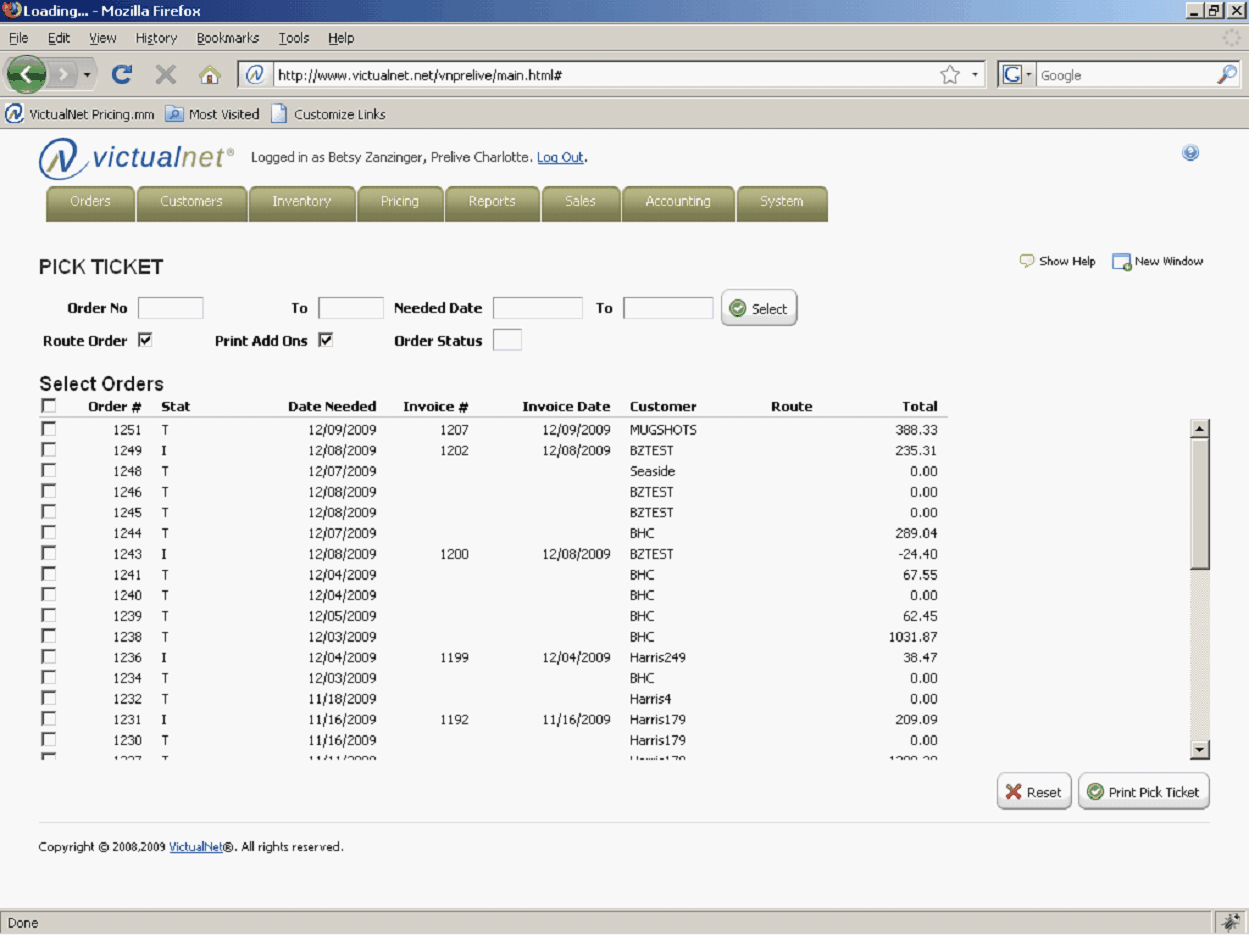
New Feature ! Add On Pick Tickets
The ability to print pick tickets that reflect only items that have been added to an order after a pick ticket was already printed for that order is not available.
If you are printing a pick ticket for an order to which you have added one or more new items, using the Order Entry Pick Ticket button, you will be asked if you want to print add ons only, or a full pick ticket which will print all items on the order.
New Feature ! Add On Pick Tickets
(continued)
If you are printing pick tickets from the Order Processing menu (batch pick tickets) and want to print add on pick tickets only, you can check the Print Add Ons flag on the Print Pick Ticket screen.
If this flag is checked, for all orders selected, pick tickets will only be printed for the orders to which new items have been added.
Note that if NO orders have new items, and this flag is checked, Food Connex Cloud will generate one pick ticket with no items on the pick ticket.
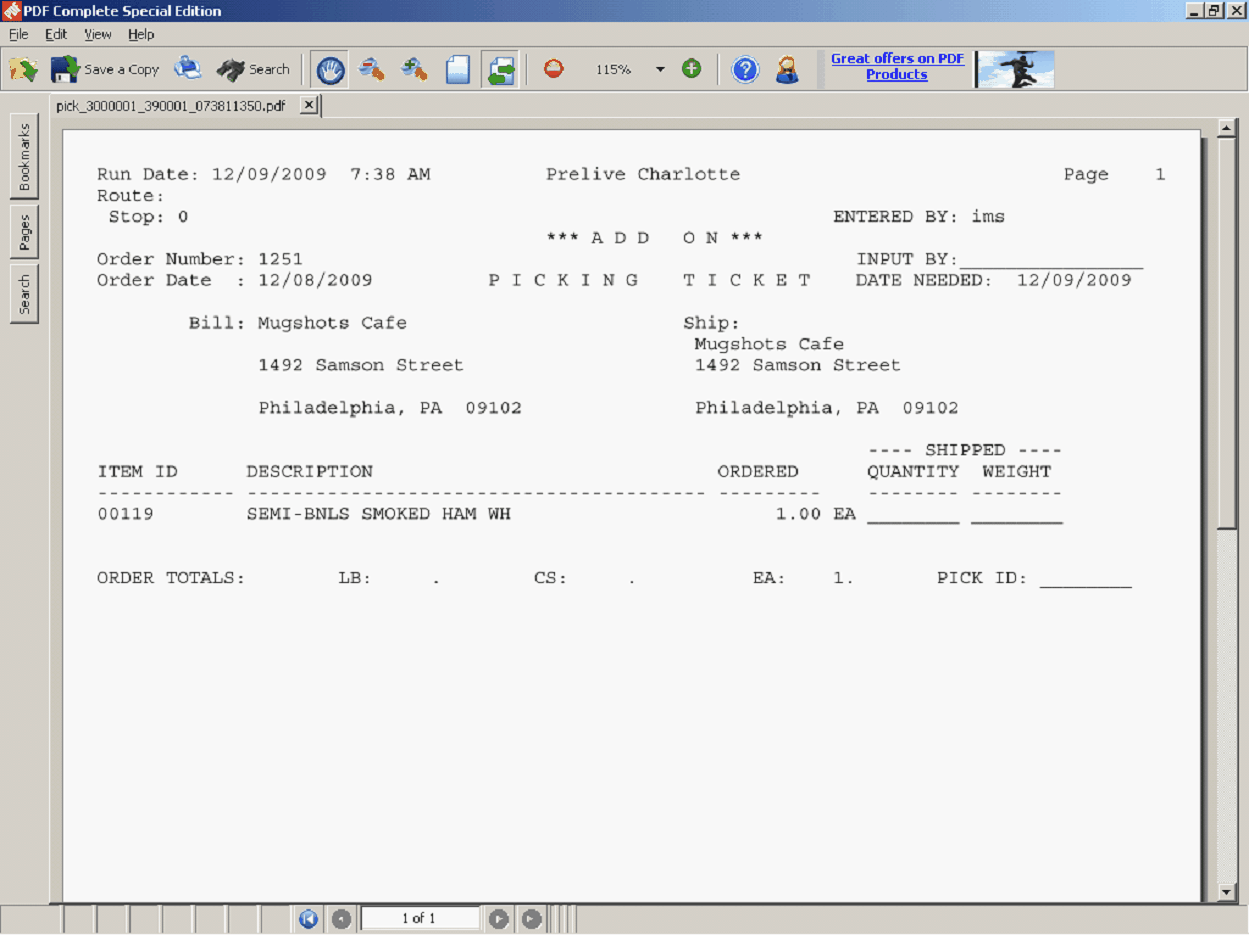
New Feature ! Add On Pick Tickets
(continued)
Add On pick tickets will have the text “*** A D D O N ***” printed at the top of the pick ticket, letting the picker and shipper both know that at least one other pick ticket exists for this order.
New Feature ! Universal Sales Export
A new Excel Export routine has been added to Food Connex Cloud which will allow you to export almost any data you want from your sales history. This export is flexible allowing you to customize it so you just see the data you want to see.
To access the Universal Sales Export, choose Reports -> Sales -> Sales Universal Export.
The following screen will be displayed:

As you can see, you have a lot of selection criteria options.
You can print the report in detail, which will show you every invoice line item that meets the selection criteria you entered.
You can also print the report in summary; you be given a choice of how you want it summarized:
By Invoice By Salesperson
By Customer By Category
By Customer Group By Vendor
By Customer type By Brand
By Chain
By Item
New Feature ! Universal Sales Export
(continued)
In addition, you can pick the fields that you want to export to the spreadsheet. There is default data that will export if you do not pick fields. On the screen below, you can see what that default data is based on the fields that are checked off.
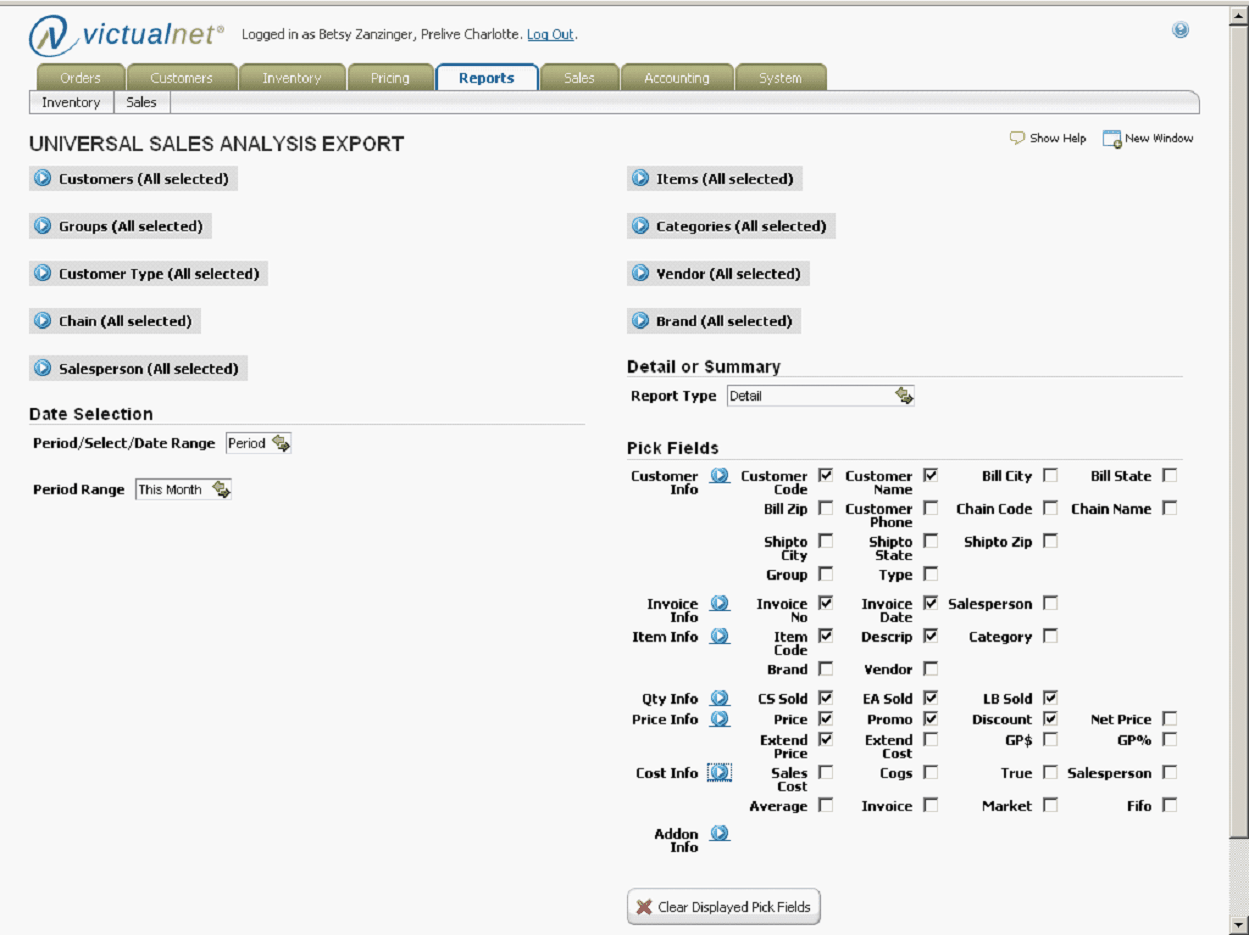
Default fields include:
Customer Info Invoice Info Item Info Quantity Info Price Info
Customer Code Invoice Number Item Code Cases Sold Price
Customer Name Invoice Date Item Description Eaches Sold Extended Price
Pounds Sold Promotion Amount
Discounts
However, you can pick and choose whatever you want to see based on all of the fields displayed above.
Note that no report will be printed; a spreadsheet will be created which you can use to calculate commissions, use for reordering, look at profitability, etc.
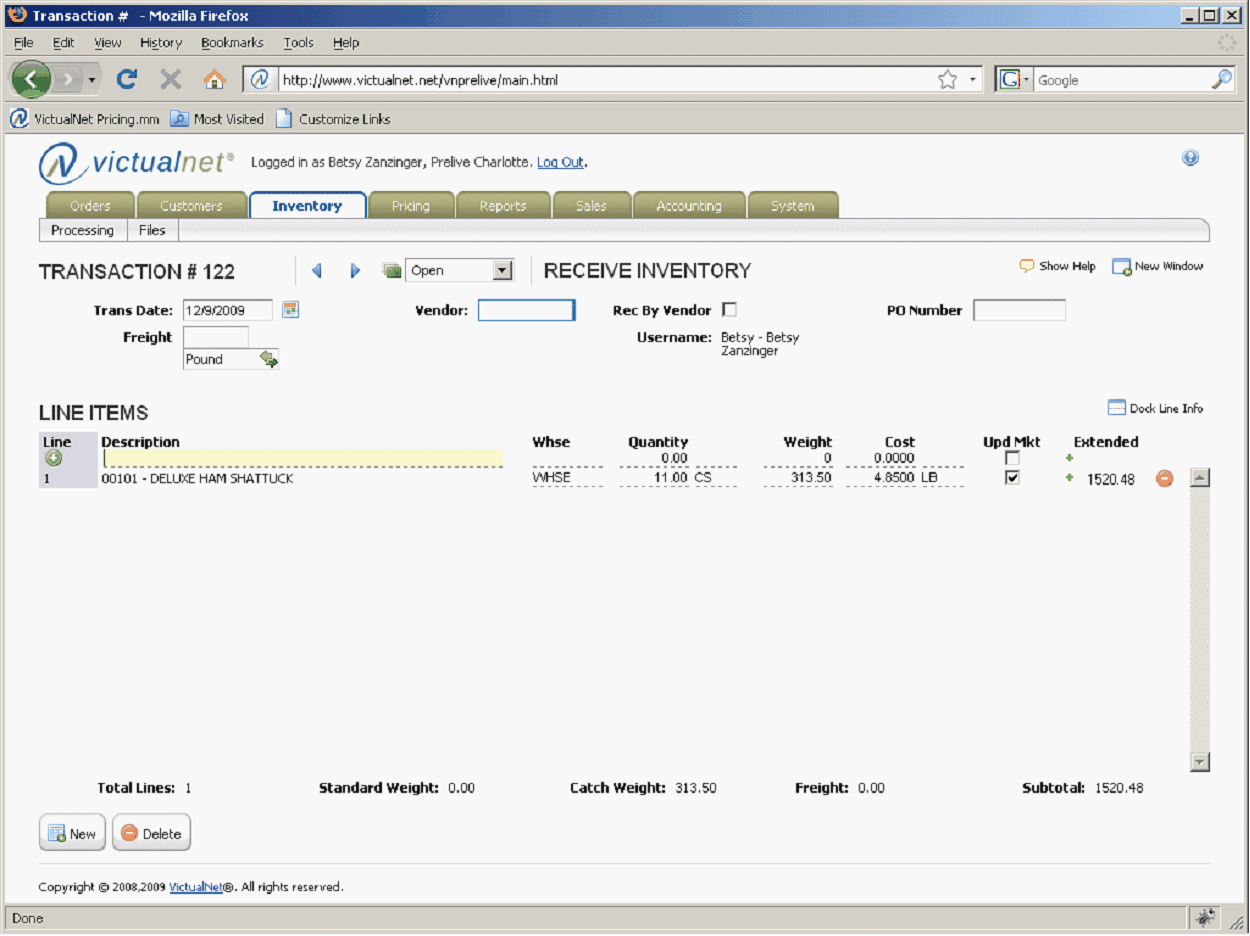
New Feature ! Inventory Receiving Cost Options
When you receive inventory, you now have some additional cost options.
You can choose which cost to display in the inventory item info bubble using the system configuration flag PO Disp Cost
You can choose what your default cost will be on the receiving line using the config IC Default Cost
You can choose whether or not to update and items’s market cost with the cost on this receipt if you turn on the config Upt Market Cost. If the flag is on, you will see a new check box on the inventory receive line with a column header of Upd Mkt, as pictured below.
If you check this box, the market cost for the item on that receiving line will be updated when you post your receipts.
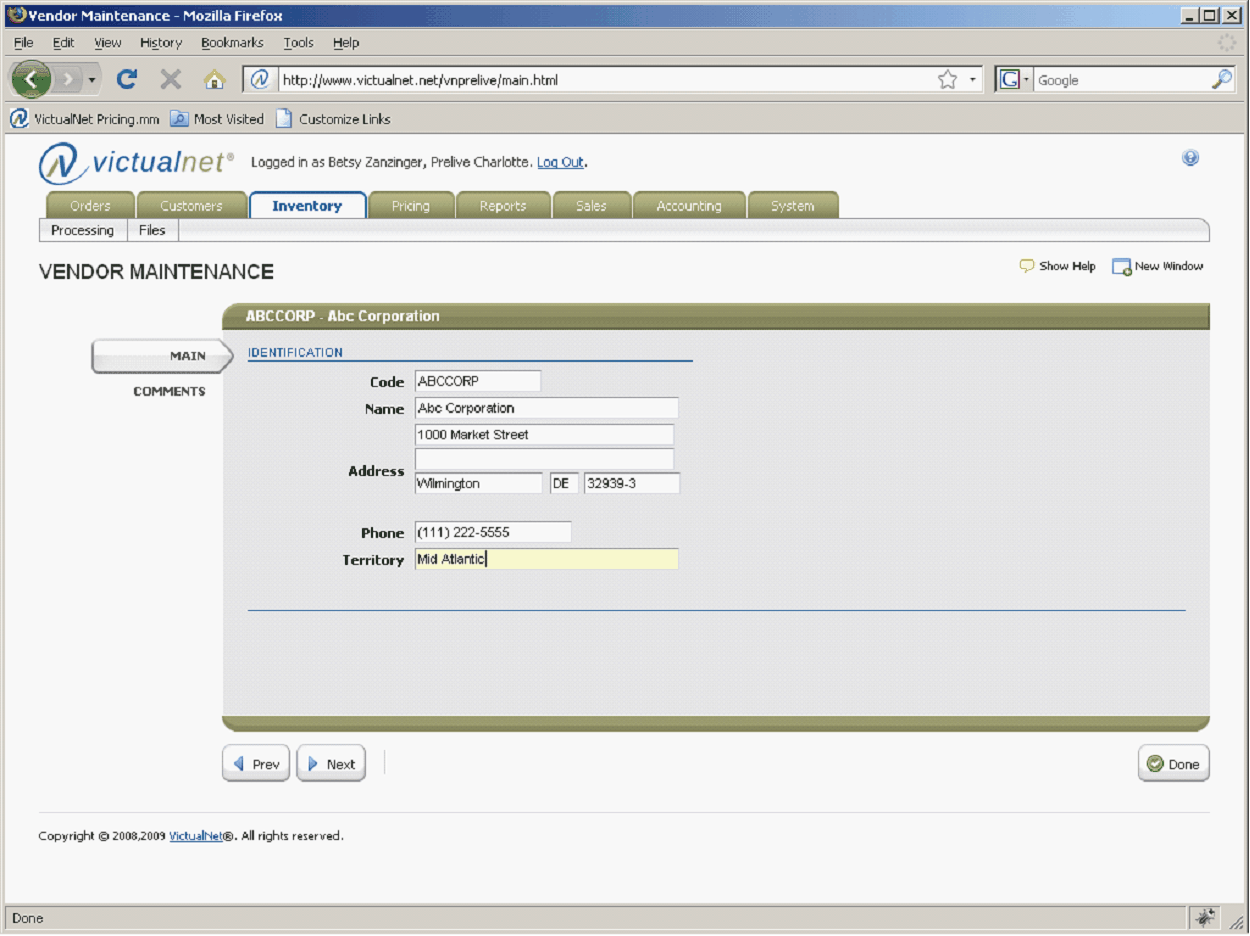
New Feature ! Assign Primary Vendor to Item
You now have the ability to assign the primary vendor to an item in the Item Master Maintenance screen. This will allow you to run sales reports by vendor code.
Before assigning primary vendors to items, you must build the vendor data, which can be accessed by selecting Inventory -> Files -> Vendors. The following screen will be displayed which will allow you to build basic information for your vendors.
New Feature ! Assign Primary Vendor to Item
(continued)
After you vendors have been built, you can start assigning them to items using the Inventory Master Maintenance option.
The Vendor is entered on the main tab.

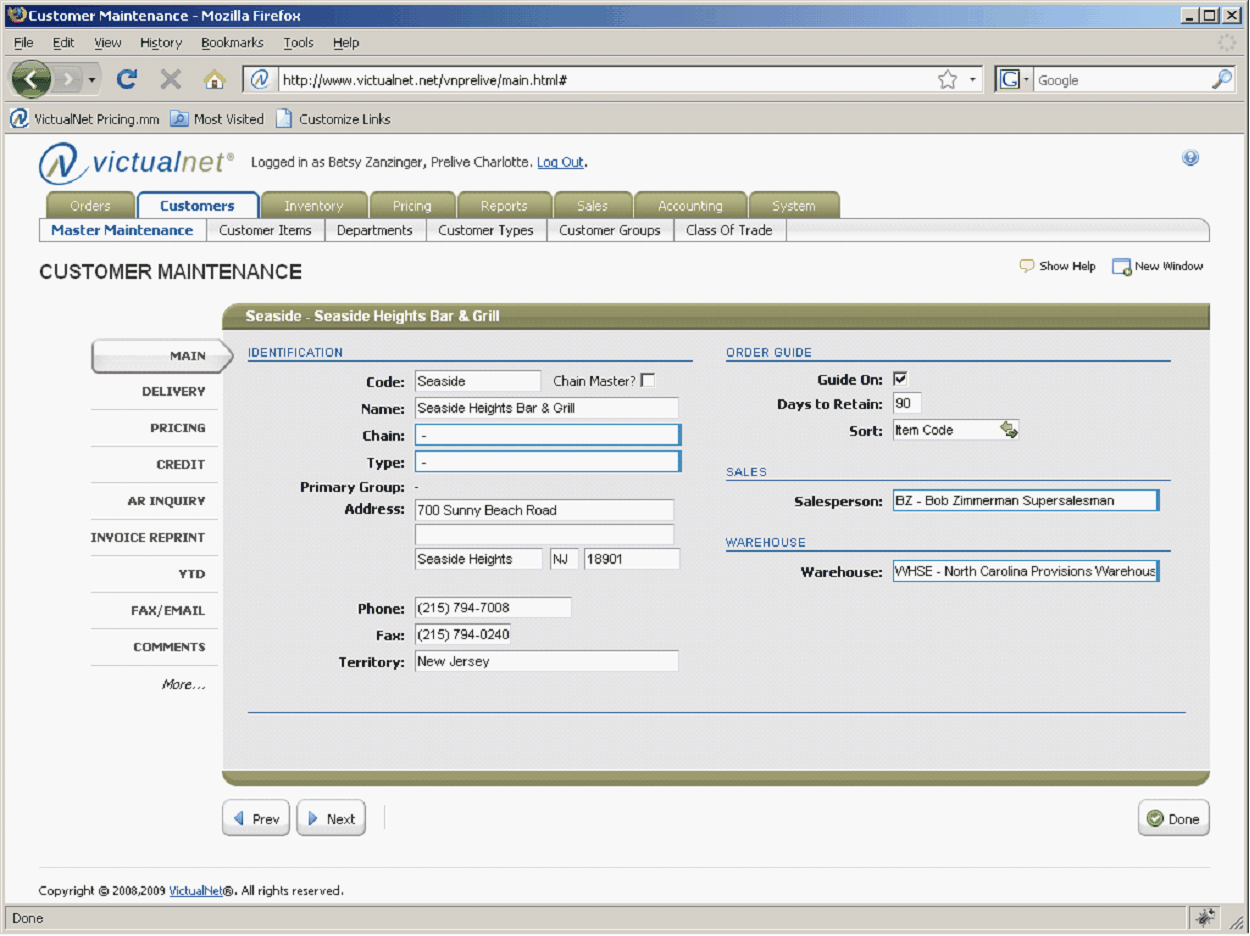
New Feature ! Customer Ship To Addresses are automatically created when a new customer is added
When you add a new customer to Food Connex Cloud, a ship to address for that customer will automatically be created, with a Ship To Code of SAME and a name and address that matches the customer name and address information.
You will not be able to edit the ship to name and address that Food Connex Cloud automatically created on the Shipping tab; in order to change this data you need to change the customer name and address data on the main screen.
If you need a shipping address that is different from the customer address, you will need to create a new shipping address in the Shipping tab.
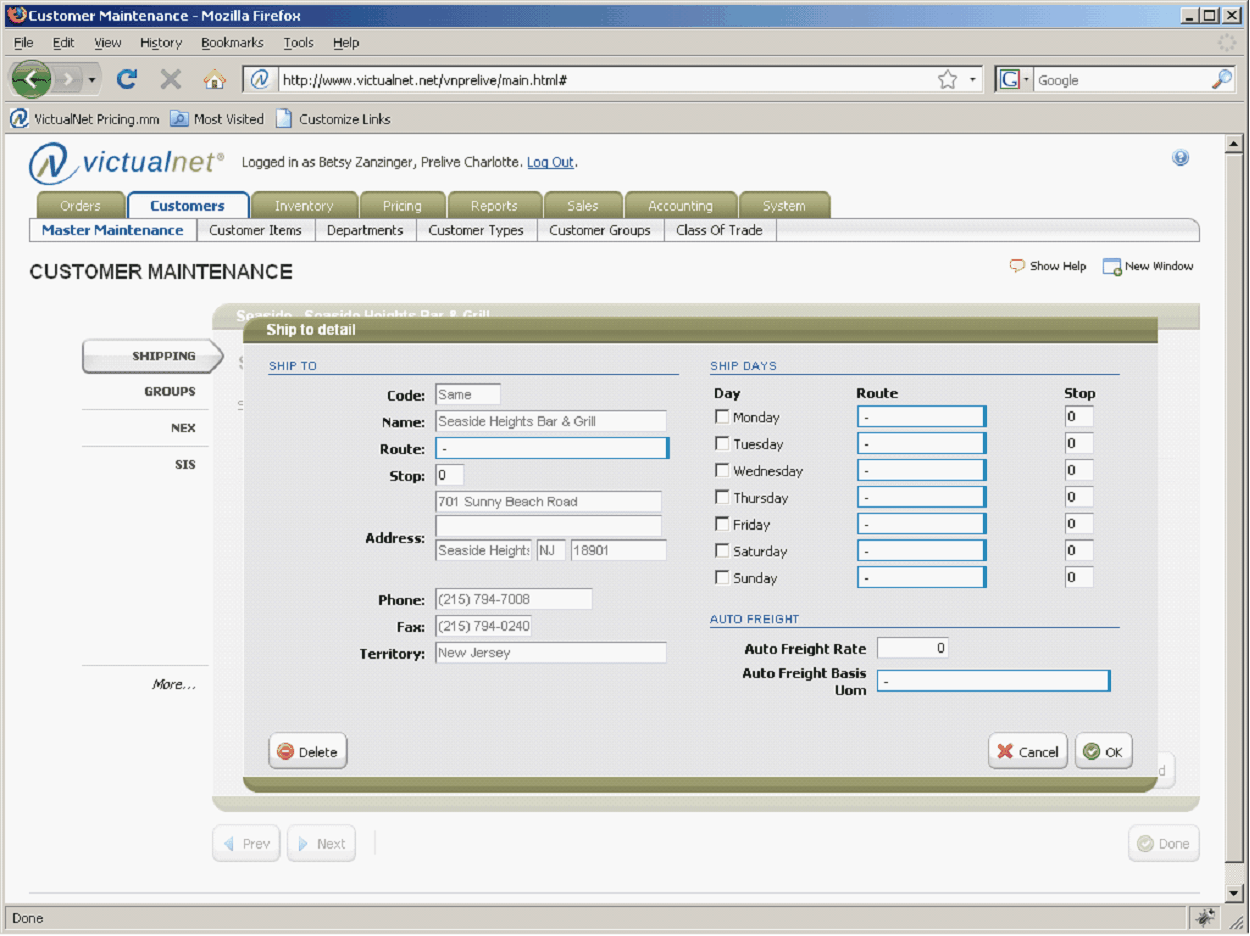
When this customer is added . . . .
New Feature ! Customer Ship To Addresses are automatically created when a new customer is added
(continued)
This shipping address is automatically created.
Note that the code, name and address information cannot be updated on this screen, but Ship Days and route and stop information can be.